Showing posts with label Fly tying. Show all posts

Monday, February 9, 2015

What is the meaning of it all?


I have my personal feeling about what fishing means to myself and it is quite simple....fun. But, I have run across others who try to suck to fun out of a relatively enjoyable sport. There are times of frustration when you encounter boat trouble, leaky waders, breaking a rod or other equipment failure. It is part of the game and it happens to every one of us at one time or another where our luck is in short supply on a given day.

This article was motivated by a fishing report I had read on one of my favorite rivers, the Pere Marquette. I prefer to fish the flies only section which is also catch and release. The rules are simple, no creel limit and tackle is restricted to artificial flies only.

Yet the article in question turned from a fishing report into a minor rant about people who use beads. Using a single bead unattached to the hook does not constitute it being a fly. However using beads in the creation of a fly is perfectly legal. Over the years I have had unfortunately run into "the elitist" who tend to think there is more to the rules than they appear.

When I first started fishing the PM I was in my early 20's and of moderate means. I didn't have the extra cash for a fly rod and reel, so I used a spinning outfit. A 12 foot fiberglass Heddon Silver King rod with a Cardinal 4 reel loaded with 10lb test and a drift rig with a fly. I could not tell you how many people told me I was illegal and I needed to leave the river or I would be reported, my gear confiscated, and then jailed and sent to hell shortly after....

I have since had several fly rods and reels and have made a couple as well including tying my own flies, but the rules are still the same as back then. I have even seen some guys with a long casting rod using a slip bobber with  a fly on the end, often a weighted eggs sucking leach or something with weighted eyes. I even know of guys who tie flies on jig hooks so the ride better under a bobber. Never have I thought of threatening them with what the DNR would do once they got a hold of them, but I have secretly praised them for trying something new, for thinking outside of the box while yet staying within the boundaries of the regulations.

Before I get into an idea of using beads into tying a great imitation of a steelhead's favorite treat, SPAWN! I had dared to ask a local shop worker if it was legal to apply a scent to an egg pattern. There are many, many egg patterns in use and I tie several, my favorite being the nuke egg. The response I received was not surprising, but the reaction was. The individual looked at me with a diabolical stare and said that scents were not to be allowed because it went against the integrity of fly fishing. Nowhere have I seen this in the regulations and have even brought it up to a DNR officer. The response I got from a person of authority was that there was nothing in the book that stated the use of scents in a flies only section was prohibited. I still have never tried it, but I'm sure others have and they have been within their legal right.

I have decided to make a fly that resembles a spawn sac made from beads. The idea is simple and the materials are readily available.


I present to you the 'Cody Sac' fly. I will get to the reason for the naming in a bit so hang with me.

Besides a vise I used a bobbin with white thread, a bobbin threader, scissors, a whip finisher, and size 6 tiemco hooks.


and BEADS! 6mm for salmon egg imitation, or 5mm for steelhead or brown eggs. You can but several different colors, but I originally started with three that looked close to color of natural roe.
 

The reason for the naming of the fly is because of a secret material I have used. It is Shetland Sheepdog fur, specifically the undercoat. It is the the purest natural white and it has a slight frizz to it. The fur was graciously donated by my canine companion......You guessed it! Cody


Shetland Sheepdogs have many endearing qualities; they are intelligent, fiercely loyal, energetic, loving, great with kids and other pets, movie star good looks, easy to train, etc. The one thing is they are hairy beasts and do they shed. They require a decent amount of brushing especially since they seem to always run through patches of stick tites! So I had all this hair and there goes the bright light and the wheels start churning.

 
The first few proto types only had the Sheltie Dub, but later on I decided to add some Ice dub for sparkle and sex appeal.


Another key element was the use of transparent beading cord most commonly used in the crafting world. I experimented with braid and mono, but the cord gave the beads the ability to move a bit especially in the 2 bead version. You can find this at any craft store for around $3


The beauty of this pattern is in the simplicity and low cost. When finished it looks exactly like a milting spawn sac without the netting.

Step 1. Put hook in vise. Wrap the white thread around hook 5-6 times and trim excess. Grab a generous glob of white fuzz and wrap on hook. Optional: before the white fuzz add ice dub to taste then apply fuzz after.


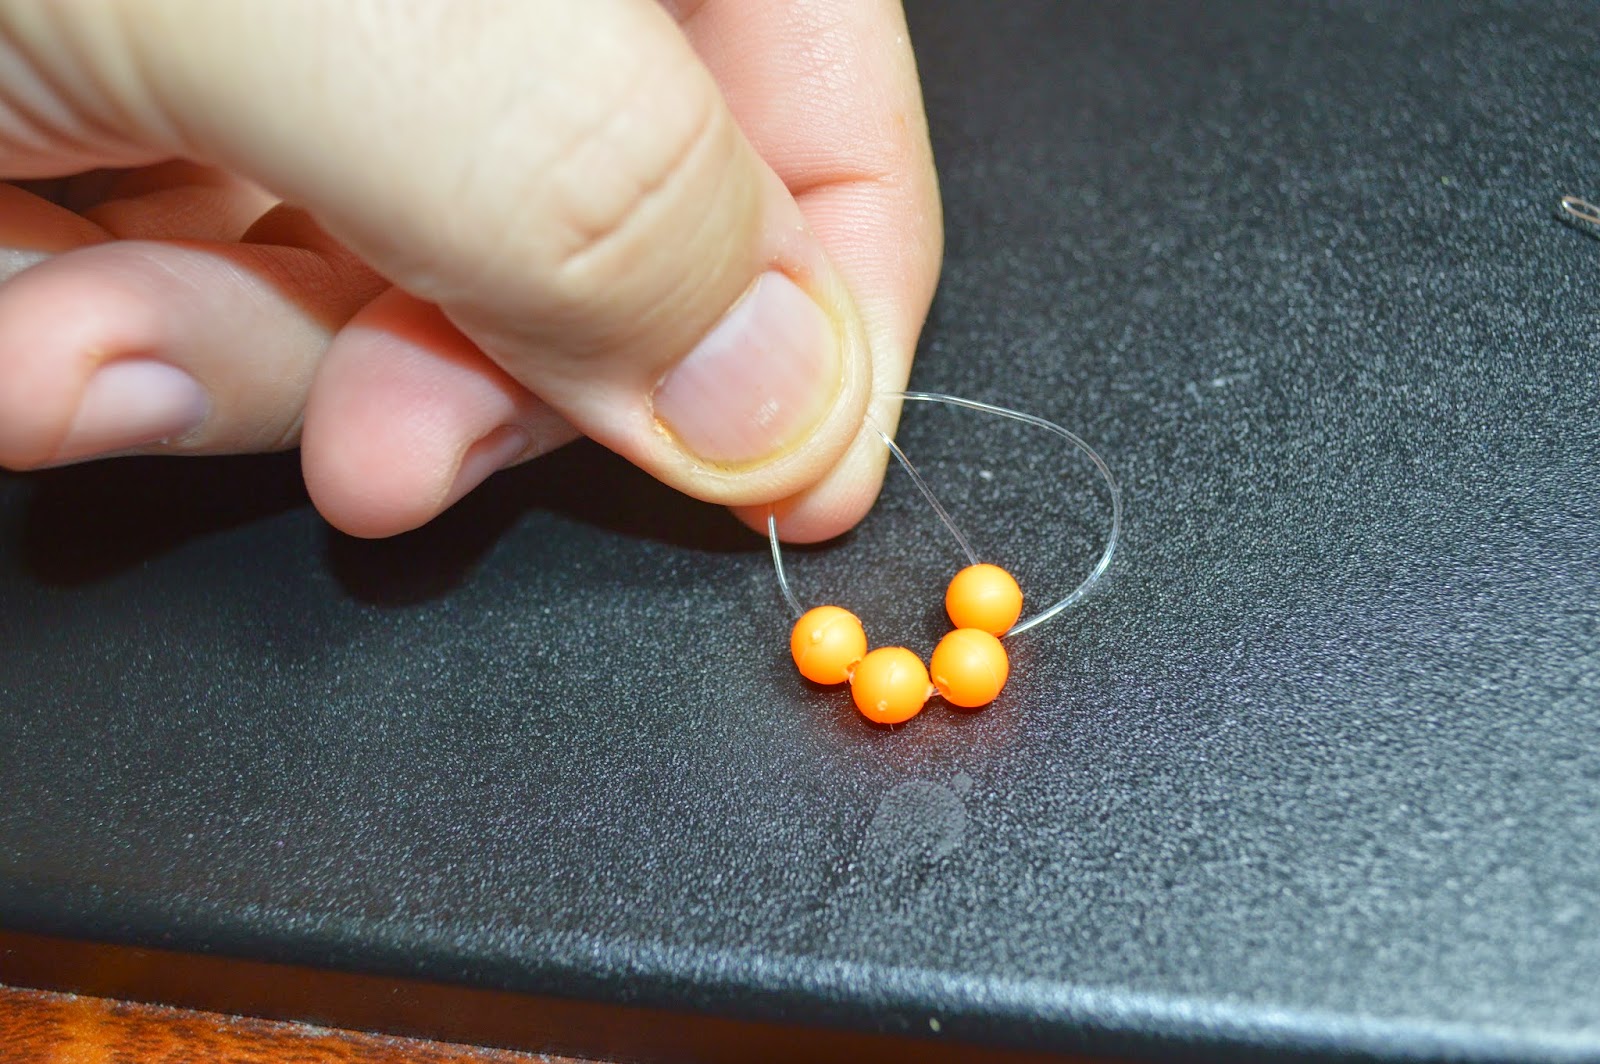
Step 2. Cut a small piece of the stretch cord (approx 4 inches). Insert 4 beads onto the bobbin threader.


Step 3. Pull stretch cord through top of the bobbin threader about half way then fold back and hold with two fingers. Slide the 4 beads onto the thread.


 Step 4. Firmly holding one end of the stretch cord, pull the bobbin threader away slowly until the other end comes free.


Step 5. Take the two ended of the stretch cord and make two half hitches.

                                         When its tied it should make a square of beads.


Step 6. place the square of beads with the knot facing the head of the fly. Give it a couple tights wraps at the head and trim excess stretch cord.


Step 7. Wrap over the top over beads in an X pattern several times until you get the desired shape. It seemed no matter how I tried it the 4 beads turned into a spawn sac shape naturally. Finish of the fly to preference. I like using a whip finisher myself.


 All that's left is to trim excess thread. Apply head cement, zap gap, or super glue as desired.


I experimented with several colors and one combo had no fuzz, but tons of ice dub. I even wrapped it in between the eggs to give the sensation off a massive milt with flash. I used green beads and green ice dub as well.


Another variation is using 2 beads with a loose cord to give the beads (eggs) more movement. This version is similar to a fly made by Josh Smith. This version remains unnamed, but I'm leaning towards 'Cajones'


All in all the purpose of this post was to rant a little about people who take themselves too seriously. Life is an incredible journey that's only as fun as you let it be. Follow the regulations in your area and respect your fellow anglers. Offer help, encouragement, and fellowship. It will only enhance your memories and experiences.


In closing I couldn't couldn't mention Cody the wonder dog without his adorable sidekick (and sister)
Kirrah, the sweetest pup who gives daily hugs!


During my exhausting and extensive research I came across some guidlines everyone should follow when applicable to your situation. May you always find what you seek while fishing. May the sun and wind always be in your favor, may the water always be cool and the fish plentiful, large, feisty, and very hungry!


Friday, January 9, 2015

The River is my Refuge

It has been a long, long while since I have been motivated to write...


My health has been the major reason I have not returned to my page. Since my last post, I have constantly struggled to get better. My emotional state declined as well as my physical health. I had finally found a good team of doctors who were helping me turn the corner...

I have had six surgeries to improve my quality of life and to try to enjoy some of the things that brought peace to my suffering. Through it all, I have come to realize one common truth
                                           
                                                    "Live for the moment!"

My fishing time has been severely limited and more often than not I am left to my own thoughts. I struggled through pain and control over my body. I find myself grateful that I still am able to do what I can.

As luck would have it I have some people in my life who will give me a swift kick in the ass when I want to give up. My wife has forced me to wake up and get ready as she drove me several hours to a fishing spot of sacrificed sleep which she is not prone to do. My son also grew into a baby man child with a driver's license and the desire to kick my ass into the river as well.

Quality over quantity has become another mantra of mine. Anything is often better than nothing as I have caught less fish but cherished each battle with more appreciation than ever.

                                                   "Pay it forward! Always!!!"

I am legally physically disabled. Some may look at me and think what the heck is wrong with him? Well, each persons medical history is their own and many choose to keep theirs private. But, know this....before you judge someone tries to understand them first. Many people struggle with unseen illnesses and the attitude that not being sick is often more hurtful than the illness themselves.

One of the greatest qualities of man is compassion. Never forget to use it! I have heard way to many times that it doesn't pay to be nice! Get yours while you can! I do not and will not understand that way of thinking.

Illness has a way of telling you what is really important in life! People! It is the relationships you make and how you treat those who are a part of your life. Over the last year, it seems I have been in touch with more of my older friends, meaning old friendships that have taken bigger importance. For me, that seems to be my old fishing buddies. Along the way, you make new ones as well that hopefully will turn into old ones too. Some of my fondest memories are often my most unexpected when a complete stranger can strike up a conversation simply due to your common love of the river and her bounty.


Even though I cannot fish as much as I would like my love for fishing is no less than before if anything the passion is even more fierce! I have tried to use the time spent not fishing for other en-devours somewhat related. One of which was rebuilding several old rods and just having fun with the whole process. Much of what I learned was trial and error and I even rebuilt a rebuilt rod to improve on it again.


There is something about catching a fish on a fly you tied and the same goes for catching one on a rod you built or rebuilt as well. There is something magical about it that is hard to explain. Anybody can buy the best rod, but to catch one on one of your own creation gives you a special feeling. It also helps that I have never been quite satisfied with the length of any fighting butts I have come across. Picking the colors and the style of the wrap to your very own liking as well as the placement of something as simple as a hook keeper with the finished product knowing everything is just the way you wanted it and you don't have to settle for something store-bought.


Then there is the feeling of letting the mighty fish swim away. Homemade fly....homemade rod....the appreciation of the fight and then the release. I can't think of a better way to spend a sunny fall morning with friends.

Most of the rods I rebuilt were close to 20 yrs old! Now, to me, they are like brand new again and the cost is very minimal compared to a brand new rod.


My favorite so far was a 9-foot St.Croix rod I used for many years and caught countless Steelhead on. The handle had gotten chewed up and the tip was busted off. I  rebuilt it on the idea of another old favorite rod I had, a Berkley Lightning Rod. I think I came close with the color scheme on the wrap but opted to paint the rod fluorescent orange to make it stand out so I went with a little bit more wrapping then I planned as well. Just a little secret, the black on the butt section was colored by a clack Sharpie!

I took another idea with using Czech beads for nymphs and with my sister's guidance even made some jewelry!


                   eventually evolving into semi-precious stones, copper and silver........


Life is a journey and one path leads you onto a path you never expected to take. I made some necklaces as well and the inspiration for creating things led into drawings and computer artwork and the idea to challenge myself to learn new ideas and create bigger and better things than I had ever imagined...
                                                

Although I have seen my share of curveballs thrown by life, I have made the conscious decision to just learn how to hit the curve, because I am sure as hell ain't about to give up.

Fishing is still a huge part of my life. I just have to listen to my body and take what I'm given and make the most of it and appreciate every chance I do get. When I get out I try to make the most of it and I still have the luck of the fishing gods on my side and with help from others, I still will be able to get into the heavy of it all.


I've found you can meet the nicest people along her banks, but the rudest as well. The choice is yours which you choose to be. My refuge is the river! we have a history....me and her! her waters flow as through the earth as mine own blood through my veins. In all of her splendor as the sun sparkles across the surface reflecting warmth onto my face and the coolness of her touch as it caresses my skin! Her roar and laughter at life as she tumbles over the rocks and logs always moving ever downstream. The smell of the rushing waters in her deep pools and eddies so dark and often menacing with untold mysteries. So many memories she holds for me......but, I am eager for the new ones yet to come!

Friday, July 6, 2012

Fly Tech: Articulated Bunny Leech

This pattern I normally tie in black, but I felt the orange would stand out better in pictures. It turned out quite nicely. My luckiest color for steelhead has always been orange, whether it's and egg pattern, or terminal tackle.

The materials you will need include: zonker strips (rabbit fur), lead eyes, primary hooks, trailer hooks, braided line, lead wire, beads, thread, and krystal flash. All seen below.

The short list of tools you will need are: bobbin, vise, scissors, whip finisher (optional), and some sort of wire snips


The first step is to put the primary hook in the vise. I  used a #4 black Mustad fly hook. Anything with good strength and a long shank will work. wrap your thread from the back to the front and then to the back again to give a good base.


Then you want to take your braided line and cut around 8 inches off of it. Fold it in half and run both ends through the trailer hook and pull then almost all of the way through. Flip the loop through the hook so it secures the trailer in place then run a 6mm bead to the hook.


Hold the trailer hook (#4 octopus hook) so that it trails 1 1/2 - 2 inches from the back of the primary hook then wrap your thread up to the front of the hook holding the braided line in place.


Attach the lead eyes to the top of the hook then wrap the braided line around the eyes. Cover the braid with the thread and run the rest along the back of the hook covering any remaining braid left over. This should secure the braid in place so the trailer hook doesn't slip at all.


Take a zonker strip and separate the fur so you have a tail length of your desired preference. you may have to moisten the fur with saliva to keep it from falling back in place. I like to keep my tail almost to the end of the trailer hook partially concealing it.


Flip the zonker fur back then attach the lead wire and wrap it all of the way to the lead eyes. The lead eyes along with the lead wire will give the fly plenty of weight to sink even in a good current. Wrap your thread over the lead wire to the lead eyes and back holding it in place.


Wrap the thread back again to the lead eyes then wrap the zonker strip with the fur facing up all the way to the same spot as your thread. Wrap the thread over the zonker strip then cut off the excess.


Take 3-6 strand of Krystal flash or Flashabou of your desired color and attach it to both sides of the fly from the eyes to the tail.


Wrap your thread between the eyes and behind it well to hold everything in place securely. Use a whip finisher or a half hitch whichever you prefer. Since this is a large fly with a lot of material I double knot it.


 Lastly apply a health dose of head cement on in between the eyes and and behind it. This will keep your fly in decent shape after a steelhead tries to demolish it.


Try making the fly in different color patterns. This one is chartruese with a green bead and chartreuse krystal flash. The lead eyes are nickle plated instead of painted. You may also use chenille or dubbing the make a bigger head around the lead eyes.


When you remove the fly from the vise take a wire snipper and cut off the the hook just where it starts to bend on the primary hook. The way the trailer hook is set up, you are able to replace the hook if the original gets bent up.

Disclaimer: I am by no means a professional tyer. I tie flies out of necessity to keep the cost of my fishing down. If you know of a better way please use it. I hope this was in some way helpful.

Tight Lines and Happy Fishing :)

Wednesday, May 2, 2012

Fly Tech: Nuke Egg (Modified)

The Nuke Egg is hands down my favorite fly. First and foremost I catch tons of Salmon and Steelhead on it! This fly is VERY fast and easy to tie. It is also and is inexpensive.

The version I will show you is my secret tech I use. I am sure I am not the first one who has thought of this, but I haven't seen anybody else use it. I will be tying a red/pink Nuke which is also my HOT color both spring and fall.


This is a list of items you will need:

Size 6 Tiemco Fly Tying Hooks TMC 105

Glo Bug Yarn (Salmon Egg)

Micro Chenille (Red)

Pink 3/0 thread

Vice, bobbin, scissors, and whip finisher (optional)


Step 1: Secure the hook into the vice. I prefer these Tiemco hooks because they are 2x . They are stronger and thicker and I haven't had them straighten on me like I have with other hooks. Salmon and Steelhead can really test your gear and your hooks or leader are always the first thing to give.


Step 2: Wind you thread from the eye of the hook about half way to the bend.


Step 3: Wind the thread over the Chenille and then work the thread back towards the eye of the hook.


Step 4: Wrap the Chenille around the hook 4-5 times forming a round ball. Secure the front of the Egg then trim excess Chenille off.


Step 4: Take a piece of pink Glo Bug Yarn and cut about an inch and a half off. The pink is now called Salmon or Salmon Egg.

Step 5: Take about a third of the yarn you cut off and put it on the hook just in front of the egg. Then fold the front haf around to the back of the hook and wind thread to secure.

Step 6: Trim the yarn to the back of the egg or a little longer and fluff!

Step 7: Finish off the Nuke Egg with a whip finisher or half hitch whichever you prefer. I do this twice then do not use head cement.

That's it! I typically use the red/pink or orange/light orange color combos. I'm sure other combos work and sometimes I experiment, but this is a good 75% of my fly box and I try to carry 25+ of each color.